Many boring log forms include a stratigraphy column (sometimes called a graphic log) where the various stratum layers encountered during drilling are represented graphically. These graphical representations are chosen by the user from the program's built-in strata patterns list at each layer change. Strata patterns may be combined on top of each other -- for example, silty and sandy soil can be shown by combining the silt pattern and the sand pattern. These combinations aren't fixed -- you can freely mix and match them as necessary. A sample stratigraphy column follows:

Many data entry forms include a USCS classification column: if you enter a classification, LOGDRAFT will automatically choose strata patterns appropriate for your soil's classification. (LOGDRAFT chooses the patterns from the legend file associated with the project -- this page discusses these files in detail.) You can override LOGDRAFT's automatic choice of patterns by just typing in your new choice; however, if you go back and enter a new USCS classification, LOGDRAFT will override your choice with the patterns appropriate to the new classification.
Once your boring is into rock, you won't have USCS classifications to enter so you'll need to manually choose strata patterns to match each layer of rock.
To manually choose stratigraphy patterns:
A list of the stratigraphy patterns shipped with the program is included at the back of your manual.
- Create or open the boring's folder.
- Each card on the boring's subsurface data entry section (see this figure) should have a field titled something like Strata symbols or possibly Stratigraphy patterns. A small button will be located just to the right of the field: click it.
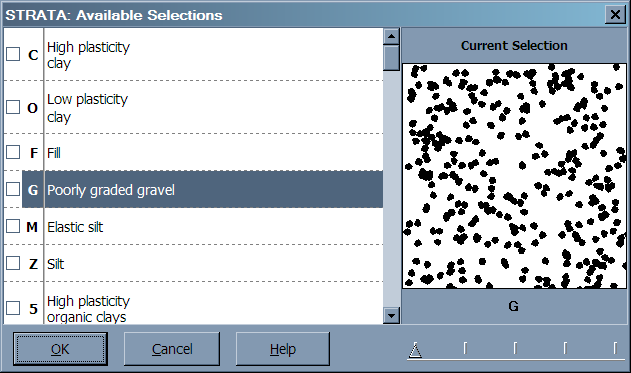
If your data entry form doesn't have anything similar, your report form probably doesn't include a stratigraphy column -- consult the Customization Guide for details on adding one. - Clicking the button displays the STRATA selections dialog (this figure). You can combine up to five different strata patterns to represent your stratigraphy: Click on a menu selection to add a pattern to the combination; click the selection a second time to remove it.
- When you're done click the OK button to continue.
If you've combined two or more patterns to denote your stratigraphy, you may want to add a description for that combination to your legend file; otherwise, when you print a legend for your boring log LOGDRAFT will print "Description not given for..." next to your pattern. To add a description for the combination of symbols, follow the directions given in this section.
You can also select patterns without going through the STRATA dialog by following these directions:
To select stratigraphy patterns without showing the STRATA selection dialog:
- Each strata pattern has a one character name -- if you print out a comprehensive legend by following the instructions given in this section you can find the names for each pattern underneath the Strata symbols: heading. (On the legend, pattern names are given in parenthesis -- if they're combined with other patterns they'll be to the right of the "--" symbol inside the parenthesis.) Use the printed legend to locate the names of the patterns that you want to use for your material -- remember that you can combine up to 5 patterns to represent a given material.
- Click on the field labeled Strata symbols or Stratigraphy patterns then enter the names of the patterns you chose. Type them one after the other -- don't put a space between each name.
LOGDRAFT plots strata patterns in the order in which they are chosen: Note that this ordering can be important. The figure below shows what happens when theCandApatterns are chosen:
Notice that in the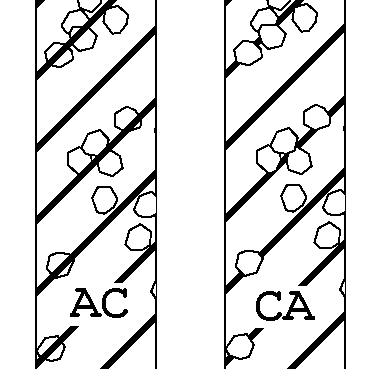
ACexample the diagonalCpattern, being drawn last, draws over the top of theApattern (the gravel). In theCAexample the diagonalCpattern is drawn first then the gravel shapes are drawn over the top. - If you've combined two or more patterns to denote your stratigraphy, you may want to add a description for that combination to your legend file -- otherwise, when you print a legend for your boring log, LOGDRAFT will print "Description not given for..." next to your pattern.
To add a description for the combination of symbols, follow the directions given in this section.
Selecting Duplicate Patterns
Patterns should only be chosen at depths where the layer actually changes: A common mistake is to repeatedly choose the same strata pattern at start of each sampling interval. Because the program draws a horizontal line across the graphic log column at every depth where a strata pattern is entered, this can result in pictures like the one shown below:
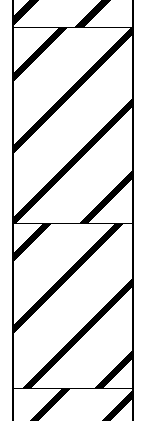
Effects of Reselecting the Same Pattern
The same pattern was chosen at 0.5, 4 and 8 feet, resulting in the unwanted horizontal lines and breaks in the pattern.
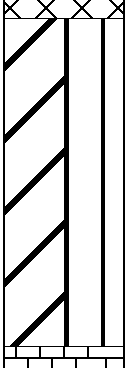
Split Stratigraphy
In situations where two dissimilar materials were encountered at the same depth, LOGDRAFT can split the stratigraphy column in half and show one material's patterns on the left half of the column and the second material's patterns on the right half. A sample split stratigraphy is shown the image below:
To show a split stratigraphy:
- Following the steps for entering a stratigraphy pattern outlined at the start of this section, select the pattern(s) to be placed on the column left.
- Next, proceed to the next data entry card and enter the same depth. On the second card choose the pattern(s) to appear on the right side of the column. The following figure shows how the image above was produced:

Data Entry to Produce Split Symbol Column