Specification envelopes provide upper and lower percentage boundaries for various particle sizes. For example, your client may specify that a given delivered material consist 100% of particles smaller than 3/8", and contain a total of 10% to 20% particles smaller than the #200 sieve.
During data entry and on printed reports, LabSuite uses specification envelopes to flag tests that do not pass your or your client's requirements. For example, some chart reports such as GSPASS include a table listing the percent finer for each sieve size, along with the specification (if any) for that opening size and whether the test passes the specification.
Specification envelopes can be shown visually on particle distribution charts, as you can see in the following sample:
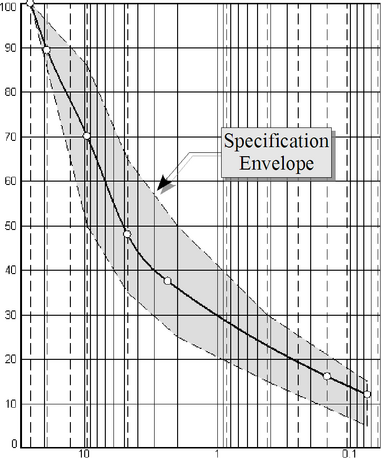
Grain Size Distribution Chart with Specification Envelope
- You can stop the program from drawing the gray specification envelope on the chart report using the Minimum number of specification points to plot selection in the Charting Options page of the program's Settings dialog.
- Specification envelopes are always optional; you don't have to provide a material specification in order to enter a grain size test.
LabSuite is shipped with a database of standard specification envelopes taken from ASTM, AASHTO, Superpave and ISSA (International Slurry Surfacing Association) standards. You can also add your own envelopes to the database:
- Select Options > Program Setup, then click on Specification Envelopes in the left-hand navigation panel.
- Click on the New button in the Envelope box on the right side of the dialog.
- At the Name prompt, enter a unique name for your envelope (i.e., not used for one of the specification envelopes already stored in the program's database).
- After you've entered your envelope name, pressing Enter brings you to the specifications grid. For each sieve in your specification, enter the sieve's opening size and the specification's lower and upper boundaries.
- Opening sizes should be entered as follows: use a "#" sign for numbered sieves (e.g.,
#40); measured sieve openings should normally be entered in dimension units appropriate for the project file on which you're working (i.e., if you've configured the project to use SI units, enter your sieve opening sizes in millimeters; for a US unit project, enter your sieve opening sizes in inches). If you need to enter a millimeter size into an envelope used for a US unit project, addMM.to the end of the measurement (e.g.,2MM.). - Lower and upper limits should be entered as percentages (e.g.,
30is 30 percent). - You can also enter a tolerance for each opening size so that any tested sieve falling outside the specification's lower and upper limit boundaries by less than the specified tolerance will be considered by the program to be passing the specification. Alternatively, you can leave the Tolerance column empty for any of the sieves in your envelope and the program will consider the tolerance to be 0%.
- Material specifications are normally given in terms of a lower and upper limit (e.g., the material should have between 10% and 40% finer than the #40 sieve); however, an alternative specification is given in terms of: X% of the material should be larger than the Y sieve size (e.g., 50% of the material is to be larger than the #200 sieve). To enter a specification such as this, enter the required percentage as the specification's lower limit and enter
100as the specification's upper limit. - If you're given a specification such as: X% of the material should be smaller than the Y sieve size, enter X-.01 as your upper limit (e.g., if your specification says 50% of the material should be smaller than the #200 sieve, enter
49.99as your upper limit), and enter0as your lower limit. There is one exception to this rule: if the largest sieves in your specification require 100% smaller (e.g., 100% of the material must be smaller than the 3" sieve), enter100as both the lower and upper limits for the sieve.
If two or more computers will be used to access your test data you'll want to make sure that the specification envelopes you use are available on every computer that accesses the test data. You can do this by making sure that the package's shareable config. files directory is set up to point to the same network directory on each computer. To do this, start your GEOSYSTEM package, then, from the program's opening screen, select Options > Setup General Options, click on Files in the following dialog's left-hand navigation dialog, then fill in the right-hand Report, data entry form and shareable config files path box with a network directory. Do this procedure on every computer, starting with the computer you've been using to enter specification sets. (The software will copy those sets from their current location to the new network share point only if the share folder hasn't been accessed by another computer first.)